Easter lamb and naturally-dyed eggs

Evermore Farm is out in Westminster, and their website starts out with the phrase “We’re so glad you found us.” I was glad to find them! They’re at the end of a very, very, very long driveway; after driving for quite some time, I was so convinced that I’d gotten lost that I called the number on the website. I got Ginger, who asked had I passed the first horse farm? Yes? Okay, then just keep going and I’d pass the second horse farm, and they’d be at the end of the lane.

Sure enough, I eventually passed Rockland Breeze Farm and pulled into the little lot at the end. When I got out of the car, I was greeted by the sound of bleating coming from the barn on the hill. It’s a gorgeous little spot, quiet with rolling terrain, and I’m sure the animals love it. Ginger let me pick whatever meat I wanted right from the freezers.

(Epilogue: K grilled the lamb for our Easter meal, using the flavor combinations from Alton Brown’s recipe. It was delicious — great flavors and very tender lamb. First time this year that he fired up the grill, too. I hope we have many good-weather days ahead; I love eating food fresh off the grill.)

As for the eggs: while clicking around for Easter inspiration, I ran across a link that suggested that you could use beets to dye eggs, and became obsessed with the idea. The most helpful link I found was this one off Serious Eats, How to Dye Easter Eggs Naturally. The writer used beets, turmeric, and red cabbage to create beautiful red, yellow, and blue eggs.

It was surprisingly easy. I peeled, diced, and boiled the beets (from week 1 of the CSA: still good!) in a quart of water with a tablespoon each of vinegar and salt. Not sure what the vinegar and salt were for; maybe they helped extract the color? Anyway, I then poured the water through a strainer, which removed the beet cubes, and let it cool. Did the same with some shredded red cabbage to produce a blue dye (the resulting liquid was dark purplish, but paper towels dipped inside came out indigo), and then simmered turmeric* in water (and vinegar and salt) until dissolved. Voila, three dyes.

I dyed both white and brown eggs. The dye was markedly more successful with the white eggs.

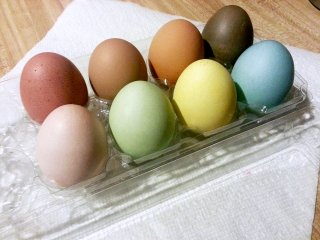
I made the green dye by mixing equal amounts of the blue and yellow dyes. The Serious Eats article is also correct in that you have to leave the eggs in the blue dye for a very long time for any color to set. To get that deep blue color in their pictures, they must have left it in for hours. Mine got maybe twenty or thirty minutes in the dye before I got impatient and yanked it out. I was very pleased with the resulting pastels. Looking forward to doing this with the kid next year, when he’s old enough to (hopefully) appreciate what’s going on.

I didn’t waste the beets and cabbage, either; since I only used less than half the red cabbage for the dye, I made the other half into sweet and sour German red cabbage, and mixed in the beets and cabbage from the dyes just before the simmering step. Turned out pretty well.

* The yellow dye recipe used an immense amount of turmeric — 6 tablespoons. I halved the amount and still used the better part of our spice jar. Also, not all the turmeric dissolved, despite my constant simmering and stirring. I think the author may have meant “teaspoons” instead of “tablespoons.”

Kid’s dragon cake

The kid turned one last month. He was born in the Year of the Dragon, so I decided to make him a dragon birthday cake.

I don’t know what came over me. I don’t usually make cakes that look like anything but, well, normal cake. But it was the kid’s birthday, so I wanted to do something special, even if he’s only one year old and has no idea.

Dragon cake in progress

I was inspired by a friend who made the Hungry Caterpillar for her own son’s first birthday. She made it out of bundt cakes and cupcakes. I figured, how difficult could a dragon be? They’re basically snakes, with legs. So I decided to make basically the same cake, with modifications (different head, spikes, etc). I didn’t want to do too much work with shaping or cutting cake, so I figured I could make my decorative items out of chocolate or (K’s idea) mold them out of Rice Krispies treats.

Since it was my first time decorating a cake, I called up my sister, who knows quite a bit about decorating baked goods, and asked for her advice. She told me about melting and cooling chocolate, and how I could either pipe melted chocolate into my desired shapes, or how I could cool chocolate into a sheet and then cut the shapes I wanted. I piped wiggly lines for whiskers, drew dark chocolate eyes onto a cooled white chocolate base, and cut chocolate spikes from a cooled sheet of dark chocolate.

Dragon's head

I made two cake recipes, a sturdy yellow cake and a moist chocolate cake. I also made one-and-a-half batches of Swiss buttercream (and would have made more, except I ran out of eggs). I poured half of each cake batter into the bundt cake mold, and I made the rest into cupcakes. I baked them and let them cool overnight, then assembled and frosted them on the morning of the party.

I added food coloring gel to buttercream frosting and made quite a lot of green frosting, as well as yellow and red for accents. I made the dragon’s head out of three cupcakes and a bit of Rice Krispies treat, and used Rice Krispies for the limbs as well. While frosting, I discovered that 1.5 batches of buttercream went really fast. Next time I’ll make more; it’s better to have too much frosting than not enough.

Hilariously, the worst part of the whole experience were the Rice Krispies treats. When I tried to make them, the melted marshmallow kept hardening rapidly, freezing into a solid ball instead of mixing with the treats. I tried to mash it together with sheer force but ended up with a thin, shattering mess of crushed Rice Krispies. I keep seeing commercials where kids are supposed to be able to make these. I don’t understand how it’s supposed to work. It’s store-bought for me from now on.

Anyway, I eventually ended up sending K out to get emergency Rice Krispies treats and a couple of tubs of store-bought frosting (I ran out of frosting and didn’t want to serve naked cupcakes).

Fortunately the dragon turned out pretty well.

Dragon birthday cake, assembled

After all that fuss, the kid freaked out when presented with cake and refused to touch it. I think he was a little weirded out by all the people staring at him. Later, in private, he accepted a few bites. Hopefully he’ll enjoy cake more in the future.

Ringing in the Year of the Snake

Technically the Chinese new year began on the 10th, which was this past Sunday. Festivities commonly last for days afterward though, so I still feel like I’m actually on time with this entry.

When I was growing up, New Year celebrations were all about the food, much of which is highly symbolic — dumplings like purses full of money, oranges and tangerines are homonyms for gold, the word for fish sounds a lot like abundance, long noodles mean long life, etc. But you don’t really think of the symbolism when you’re eating — it’s just a celebratory meal, to start the new year off right.

This year K and I invited our families over for hot pot. Hot pot is easy, all prep and no cook; you just put out plates of raw meats and cleaned veggies and a couple of electric skillets with simmering water, and everyone cooks their own food right there on the table. Just be sure to keep the “raw” cooking implements away from the “safe” eating implements to avoid cross-contamination, and you’re good to go.

hot pot on the table

Everyone can cook food to their desired doneness. For instance, my mom likes to wave sliced beef gently in the water until the red just fades to pink, whereas K’s mom leaves beef in the water until it’s very well done.

When I was growing up, my siblings and I would hoard food with fanatic possessiveness; any onlookers would have heard plenty of “that’s my shrimp ball! I put mine over here! Get your own!” etc. Now that we’re adults, it’s a lot more relaxed.

For hot pot this year, we did our shopping at the huge new Lotte in Catonsville and it was fantastic. The thin-sliced meats are perfect for hot pot; we got pork, lamb, beef (ribeye) and duck, all thinly sliced and ready to go. We bought squid, which K cut crosswise so that the pieces would curl up when cooked. We also got frozen fish balls and beef balls (we were delighted to find Lotte’s bulk frozen meatball display in the freezer section, $5/lb!). My mother brought peeled shrimp and “white rice fish” (whitebait), both of which cook up in a flash when they hit the hot water. For vegetables, we got Napa cabbage and watercress, and K’s mom brought snow peas; we also bought canned straw mushrooms and quail eggs, also from Lotte. We put out bottled condiments so that people could make their own dipping sauces (soy sauce, hoisin, oyster and XO sauce, sriracha). It was definitely an impressive spread.

We had cooked food, too. K’s aunt brought homemade turnip cake, which I intend to learn to make; it’s fantastic sliced thin and fried crispy. And K and his mom made dumplings and steamed shumai that morning. It was so delicious; I feel full just thinking about it.

Anyway, when everyone is finished cooking, the cooking water will have taken on all the tastes of the meat and the vegetables. That’s when you put in the noodles to cook (transparent saifun, also from Lotte), and let everyone finish off the meal with a bowl of hot noodle soup. It’s a warm and filling end to a great meal. After all, nothing beats eating a big dinner with family.

adventures of a butterfly cookie cutter

…or, how to get three desserts out of one cookie cutter. First, the background:

My sister is going to have a little baby girl! I’m tremendously excited. I have to constantly exert all sorts of self-control lest I buy every “my auntie is awesome!” onesie that I happen to come across. Anyway. Her friends did most of the hard work involved in throwing her a baby shower; all I did was to volunteer to contribute baked goods. The theme: butterflies.

I bought myself a tiny butterfly cookie cutter, about 1″ by 2″.

butterfly cookie cutter

I decided to make Linzer cookies with butterfly cutouts. I used this recipe by Ina Garten, who has never led me astray. They worked well, for the most part, except the whole process was rather time consuming. Because it was so warm in the kitchen, the dough kept getting too soft to cut properly. I had to chill the dough in the fridge, take out a section, quickly roll it and make cuts, and stick the cut cookies and the remaining dough back in the fridge again. Repeat as necessary.

The cookies turned out well though. That’s cherry preserves in the middle.

Linzer butterfly cookies

Instead of rolling the cutout butterflies back into the dough, I baked them as well, with just a sprinkling of coarse sugar. Then I used them as toppers on Rolo pretzels. I hadn’t made Rolo pretzels before, but a coworker swears by them for easy entertaining. Basically, you put a Rolo candy on a pretzel, bake it until the Rolo is softened but not melting (about 3 min inside a 350 degree oven), and then smush a nut or something on top and let the whole thing cool to solidify. Since the kitchen was warm, these also went into the fridge to cool and set up after assembly. I’m glad the fridge was fairly empty that day. These also took some time to assemble, mostly because I had to unwrap each Rolo candy individually.

The shortbread butterflies worked beautifully with the caramel Rolos and the salty pretzels. Looked cute, too.

butterfly Rolo pretzels

Finally, because I still wasn’t done with the butterfly cookie cutter, I decided to make a butterfly version of Deb Perelman’s white and dark brownies. Essentially, she bakes up two batches of brownies (white and dark chocolate), and then proceeds to cut heart-shaped centers out of each piece and swaps them so that the colors contrast and the brownies are uber-cute. Check out her photos; they’re beautiful.

For some reason my white chocolate brownie batch came out thinner than the dark batch, but I was still able to painstakingly cut butterfly centers and swap them. (After chilling the cooked brownies. Everything needed to be chilled!) Also, thank goodness brownie material is sticky; whenever I cracked the corner of a brownie, I was able to unobtrusively press the cut together with my fingers. The end result turned out quite nicely.

butterfly brownies, white and dark

The shower went well, and I’m proud of my baked goods, but I think I’m ready to take a break from the butterfly cookie cutter.

(Photo credits: Linzer cookies and brownies from LB’s camera; Rolo butterflies from KL.)

food of my people: bao

Happy Chinese New Year! This Year of the Dragon is supposed to be extra-fortunate, at least from what the internet is telling me.

Bao aren’t New Year specific foods — they’re more everyday foods — but since I didn’t really cook anything specific* for New Year, here’s a bao post.

* If you’re looking for New Year specific foods, try dumplings, fish, noodles, and tangerines. Most of these foods are eaten because they’re homonyms or symbols for wealth, abundance, longevity, etc. Chinese are big on symbolism.

Bao are just buns, with or without fillings, steamed or baked. I’m usually a baked goods fan but I love the texture of steamed bun, the taste of it, and how the chewy white dough pulls apart in your hands. We made a bunch of buns with fillings: chicken and mushroom (mushroom left over from the jung extravaganza), curry beef (just ground beef cooked up with curry paste, courtesy of K) and char siu. We followed the recipe for buns and char siu from Andrea Nguyen’s Asian Dumplings book.

The procedure is actually quite simple. You make the dough, let it rise, cut it into chunks, form each chunk into a ball, flatten it into a disk, close the disk around the filling, and steam the finished bun on a square of parchment paper. (Purists get very deep into the type of flour to use, and steam their buns on cabbage leaves. But all-purpose flour and parchment paper work just fine.)

making bao

After some practice, we were able to figure out the correct amount of filling for each bun (don’t want to overfill them and have them split in the steamer).

waiting bao

These bao are doing their final rise while waiting for their turn in the steamer.

steamed bao

Fresh from the steamer! They freeze beautifully, too.

(The buns you can get at dim sum tend to be whiter and fluffier than the homemade ones. Word is that this is due to the quality of the flour, or maybe the dough starter, or something. It’s okay; the homemade ones are adorably rustic and plenty tasty.)

food of my people: jung

There’s something about winter that makes me want to hibernate. (Yes, even though it really hasn’t been that cold outside.) I want to squirrel away a stash of food and curl up in a nest of blankets, with a cup of good hot chocolate, and wait out the winter.

This winter, I stashed away a ton of jung.

When I was little girl, I remember my mom making jung in massive quantities. She’d make piles of them, boil them in giant steaming pots, freeze them, and ship huge boxes off to family. They reheat beautifully, each one an entire meal wrapped in bamboo leaves: rice, beans, meat, and mushrooms. All you have to do is take one from the freezer, let it defrost overnight in the fridge, and then take off the plastic wrap and pop it in the microwave (under a damp paper towel) until heated. Peel off the leaves and dump the filling onto a plate. Just like that: dinner.

She doesn’t do it much anymore, because it’s a ton of work (there’s so much prep that it’s not really worth doing unless you’re going to do it in bulk), but when we said that we wanted to learn to make them for ourselves, she was more than willing to come over. She was even willing to do the shopping (she goes to the Chinese grocery stores in Rockville, where they are more likely to have the ingredients than the Korean stores up here). There was just a little preparation beforehand that she wanted us to do…

– boil bamboo leaves, then rinse off any dirt
– soak sweet rice in salted water overnight (the volume of water should be 1.5 times that of the rice)
– soak dried beans in salted water overnight (the volume of water should be 2 times that of the beans)
– cut up pork into appropriately-sized pieces, salt generously, and marinate overnight (we used pork belly for the tasty fat, but pork shoulder (aka butt) can also be used if less fat is desired)
– soak dried shiitake mushrooms

assembly

She dropped off the ingredients the night before. Then, the next day, she showed up to a kitchen full of soaking pots, and showed us how to make the jung. You create a pocket in your hand using two overlapped and folded bamboo leaves. You fill the pocket with filling (the one in the picture has beans, pork, peanuts, and a rehydrated mushroom, but no rice or Chinese sausage yet), and then fold one more leaf over the filling to seal. Tie everything shut with a piece of string. The jung will expand slightly when boiled, so make sure your knots are good and there are no rips in the leaves.

We made piles and piles of jung. This is just one of the trays:

finished products

As you can see, there are no real rules to the shape of the resulting jung. I made triangular ones. K made pillows. Both turned out well. After assembly, the jung were boiled for a minimum of three hours (to reduce the amount of steam in the kitchen, K made use of the turkey fryer in the back yard), then dried on pans, then plastic-wrapped and put in the freezer*. I forget how many we made, but there’s a giant pile of ready-to-eat meals in the freezer now.

My inner squirrel is quite content.

.

* …except the ones that developed structural instability (slight leaking) during the boiling phase; those we stuck in the fridge and microwaved for meals over the next few days. Cooks’ privilege.

leftover quiche custard: a tasty dilemma

What to do if you’ve made two quiches (with spinach, diced ham, and Swiss cheese), but still have over two cups of quiche custard left unused, as well as a block of leftover cheese and some extra diced ham… and you don’t feel like making yet another quiche?

2 quiches

One solution: Make a savory bread pudding. Saute some chopped kale with the extra diced ham. Then shred the rest of the cheese, and cut most of a loaf of white bread into cubes. Grease a baking dish with a bit of butter. Layer the bottom with bread cubes, sprinkle kale/ham saute on top, sprinkle with shredded cheese. Repeat two more times, ending with a cheese layer. Beat three more eggs into your leftover custard, then pour into the pan, soaking the bread cubes evenly. If you feel like it, dust the top generously with grated Parmesan. Bake at 350F until the pudding is bubbling and slightly browned on top.

Serve and eat! Try not to fight over the crunchy edge pieces.

savory bread pudding

summer CSA week 8, and zucchini adventures

Last week’s CSA brought us cantaloupe, 3 beets, 6 ears of corn, 2 pounds tomatoes, a single large eggplant, peaches, zucchini, and nectarines, as well as the usual eggs and bread (Great Harvest challah).

summer CSA week 8

We’ve already made pretty good progress; the cantaloupe was ripe and perfect, so K and I ate it up within the first couple of days. The peaches and nectarines disappeared similarly quickly (Maryland summer peaches are absolutely wonderful). I made the Lee Bros. Creamed Corn recipe* with the corn, and K made two stir fry dishes: one with shrimp and tomato, and another with ground beef and cubed eggplant. Fantastic dishes, both.

* Note on the Lee Bros recipe: if you try it, go easy on the salt. I think the Diamond brand of kosher salt they have down south is less strong than the Morton’s we have up here. I salted to taste and used barely half of what they did.

This past weekend was notable for two things: 1) K cooked an entire ham on the grill, and it was amazing (went well with the creamed corn, too); 2) I used up four pounds of zucchini.

See, we had a giant zucchini sitting in the fridge; a friend of ours picked it from his garden. Apparently zucchini gets really big if you don’t pick it in time…

Continue reading