summer CSA, week 2

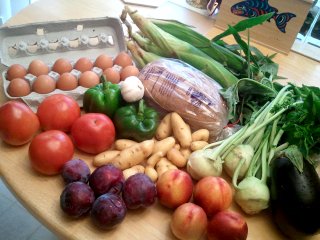
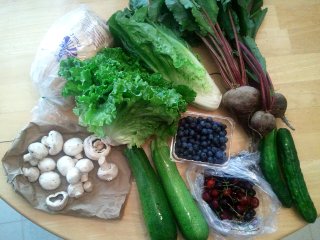
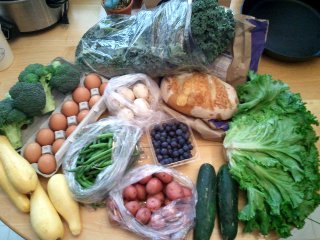
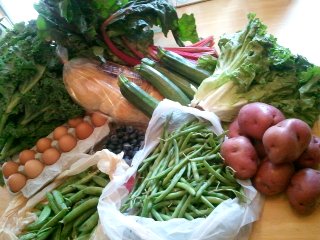
Week 2 of the summer CSA and the greens are really starting to roll in. We got kale, chard, green leaf lettuce, zucchini, green beans, English peas, red potatoes, blueberries, eggs, and bread (Great Harvest challah).

summer CSA, week 2

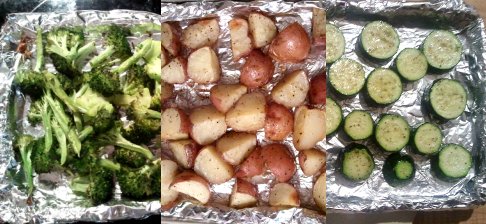
Looks like I’ve got another night of preparing green things in my future. I knocked out most of the veggies from last week in one evening, and stuck them in the fridge in sealed containers. I used to assemble dinner from raw ingredients, but now that we have the kid at home, the weeknights are a lot busier. I find it easier to consume vegetables on busy weeknights if they’re already prepped.

cooked veggies from week 1

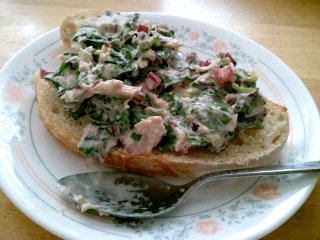
If you don’t want to eat spinach raw, it cooks down incredibly easily. Just give the leaves a rough chop, wash them well (CSA spinach is so grimy that it needs about three rinses), and then put them in a pot on medium heat with a little water still clinging to the leaves. Season to taste; I sprinkle with salt, pepper, and garlic powder. Stir occasionally. The leaves will wilt down to about a quarter of their previous volume. I serve it just like that, as a side, but I’ve also been known to mix it into quiches, omelets, or cheesy bakes.

This time, I prepared pattypan squash by cutting off the stem, chopping the remaining flesh into chunks, and then sauteing them in butter with some salt and pepper, until everything is soft and cooked through. The squash also works well roasted in the oven.

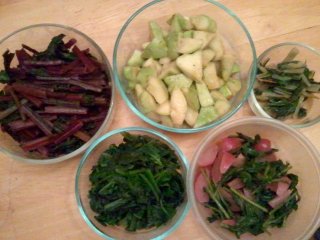
I’m always happy to see beets, because then I get long and luxuriant beet greens. I just cut them up, stems and all. I wash everything in the salad spinner, and then saute the pieces in olive oil with a pat of butter. Season to taste. I prepared the chard in the same way. The chard stems were narrow, so I tossed everything in at once, but if the stems are thicker, I put them in before the leaves so that they get more cooking time.

(I used to wash veggies before I cut them, but then I had wet leaves dripping everywhere. Now I chop before I wash, which is much simpler overall.)

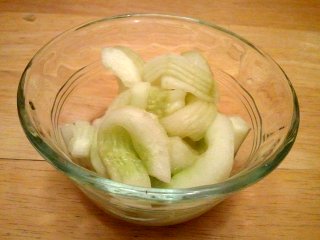
The remaining dish contains radishes and radish greens, braised in butter (see this post for the recipe link). I also made Mom’s cucumber salad with the cucumbers, but it’s not pictured as it was chilling in the fridge at the time.

If the harvest is good, belonging to a CSA means that you’re drowning in a bounty of vegetation. However, if you don’t eat it, it goes to waste. In the past, I’ve pulled wilted brown vegetation out of the produce drawer, and tossed it sadly in the garbage. By doing my prep work early, I hope not to waste a single item. So far, so good!

(Yes, it’s only the second week… but it’s a good beginning.)

summer CSA, week 11

This week on the CSA: 6 ears corn, 4 kohlrabi, 1 eggplant, four nectarines, five plums, fingerling potatoes, tomatoes, green bell peppers, a head of garlic, eggs, and bread (honey whole wheat). There’s also a bundle of basil and parsley hiding behind the eggplant.

summer CSA, week 11

There were samples of raw kohlrabi at the farm, cut into matchsticks. I tried one. It tasted, well, raw and crunchy. Apparently it makes good slaw. I can see it being pretty tasty with a good dip, like hummus or a creamy dressing.

I’ve also recently rediscovered my love for ripe red tomatoes. This has become my favorite summer dish:

– Toast a slice of parmesan sourdough bread. (Other bread will work too, but parm sourdough is the best.)
– Rub the toasted bread with the cut side of a clove of garlic.
– Spread mayonnaise on the bread. (There was mayo in the first tomato sandwich I ate, and now I’ve imprinted on it.)
– If you’re brave and like the bite of raw garlic, mince up the garlic and sprinkle that on the bread too.
– Cut a ripe red tomato into slices, from pole to pole. Spread the slices on the bread, overlapping if necessary.
– Sprinkle with a chiffonade of basil, and salt and pepper to taste.
– Eat!

tomatoes on toast

fruits and vegetables outside the CSA

Ever found yourself with a crudite platter? You know, the trays with containers of cut vegetables and a little plastic bowl of dip? You might find one when you’re cleaning up after a party, and some well-meaning guest brought a crudite platter which people barely touched. And then there you are with a huge tray of cold, crunchy vegetables. What do you do?

crudite platter

Me, I can only take so much raw veg, so I roast them. Toss the broccoli florets, carrot sticks, and cauliflower with a good drizzle of olive oil and some seasonings; I like salt, pepper, garlic powder, and a little cayenne for kick. Then spread them in a single layer on a foil-lined baking sheet. Add the tomatoes after. Tomatoes are fragile and don’t like getting tossed with harder vegetables.

roasted vegetables

Roast at 350F for as long as seems appropriate. K likes cooking the vegetables until they’re just a bit brown on the outside, but still crunchy on the inside; I like roasting them to utter oblivion, until the tips of the florets darken and the carrots are limp and the tomatoes are wrinkled little sacks. It’s your call; just check up on them every now and then to make sure they don’t burn. You can serve them alongside any kind of entree, or just eat them as is, fresh from the oven. Put the leftovers in the fridge; they’ll reheat.

Our house is also currently well supplied with fruit. The CSA peaches were so perfect and juicy that I couldn’t wait an entire week to get more; I headed out to the farmers market on Sunday and bought an $8 basketful. Some were firm and some were so soft and ripe that they just begged to be eaten that very day.

peaches and apples

I also picked up a $3 quart of apples from the same vendor but sadly, those weren’t as good — the flavor was okay, but the texture was very mealy, and I prefer my apples crunchy. Still, they make perfectly decent afternoon snacks.

To round out my non-CSA fruit and veg experience, I’ve been getting a lot of produce from a coworker of mine who has a garden that’s producing overtime. For a while he was picking two cucumbers a day, and lately he’s been inundated with tomatoes. I helped myself to some of his extras: sweet, delicious cherry tomatoes, normal red tomatoes, and little green tomatoes called “green zebra stripe.” They’re all fantastic. We like serving tomato slices alongside fried eggs for breakfast, sprinkled with salt and pepper.

garden tomatoes

Perfect peaches and ripe, juicy tomatoes. I love summer.

dinner for four on a CSA pantry

I hope everyone had a lovely Independence Day weekend. I only had to cook one meal over the weekend, but it was an adventure.

The problem with splitting a CSA share is that you often end up with an awkward number of vegetables. They give you four beets, but after the split, you keep two. Three kohlrabi and two cucumbers in the share, but you keep only one of each. After a few weeks, the produce drawer is a hodgepodge of mismatched vegetables, none of which really look like they can turn into a side dish of any substance.

On the spur of the moment, we invited some friends over for dinner, and in the fridge I had:
– four tiny beets
– four small pattypan squash
– one solitary kohlrabi
– two cucumbers

Instead of trying to combine the vegetables into one big vegetable side dish, I decided to make up several smaller dishes, served family-style. Cold pickled dishes are welcome in summer; I made Mom’s cucumber salad out of the two cucumbers, and used up the beets in this pickled beet recipe. Another great thing about pickled vegetables: you can make them well ahead of time.

(Quick recipe review: I’ve never had any luck peeling the skins off of beets after they’ve been cooked, so I peeled them raw first, then cubed and steamed them. I executed the rest of the recipe as written and was pretty pleased, but if I try it again I’ll use less mustard and maybe add a bit of powdered ginger instead; the mustard flavor was a bit strong.)

Pattypan squash cooks up more or less like zucchini, and as far as taste and texture goes, kohlrabi is essentially a giant overgrown broccoli stem, so I figured they would both roast up quite nicely. I cut both squash and kohlrabi into about 1-inch chunks and tossed them with olive oil, salt, pepper, and a pinch of dried oregano. I also added some roughly chopped pieces of garlic for flavor. Then I spread them on a foil-lined pan for roasting. K likes cooking steak on a cast-iron pan according to the Alton Brown method, so we quickly defrosted four smallish steaks. Since the oven was hot anyway, I just tossed the squash and kohlrabi in to roast up as well, and pulled them out when the edges were just starting to brown.

It turned out to be a really good meal. The steak was great, there were no vegetable leftovers, and our guests declared themselves full. Success!

summer CSA, week 3

Week 3 of the summer CSA: romaine and green leaf lettuces, beets with their greens, cucumber, giant zucchini, mushrooms, cherries, blueberries, and a loaf of plain white bread. There are no eggs, and it’s my fault; I forgot to get the eggs. At the farm, everything is up on a table except the eggs, which are on a pallet on the floor… and I walked right by them. Oh well.

summer CSA week 3

You can see a much prettier picture on Allura’s blog, where she is also tracking her CSA experience.

It was a beautiful day to visit the farm, actually. The littlest members even got to get up close and personal with some of the sheep.

the sheep are happy to get lettuce

Even though I forgot the eggs, I still stood in line to buy some extra pints of blueberries and cherries. The berry season in Maryland is tragically brief and you have to get the good stuff while you can. I picked up blueberries from Giant and Harris Teeter to tide me over between CSA pickups, and they just didn’t compare. I don’t know what goes into these Maryland blueberries, but they’re ten times sweeter and more delicious than anything in the stores. People, get yourselves out to the farmer’s markets and get those blueberries while you can.

We did pretty well eating the food from last week, too. The lettuce and cucumber went into salad, the kale got baked into chips, the yellow squash went on skewers on the grill, the mushrooms and potatoes accompanied K’s fabulous cast-iron steak, and I boiled the eggs for quick afternoon snacks at work. We finally got around to eating the green beans with lunch today.

(Quick green bean treatment: rinse, trim the ends, toss with olive oil and seasonings (I like salt, pepper, garlic powder), put in microwave-safe bowl and microwave two minutes; remove bowl and give the beans a toss. If you think they’re done (that is, if you like your beans crunchy), stop there; if not, microwave one more minute at a time until done, checking as you go. There are other ways to prepare green beans, but this is the quickest I’ve found by far.)

I’ve also been making good use of the toaster oven in this heat. Almost everything does well in the toaster oven.

toaster oven cooking

Swiss chard tuna salad

I had some Swiss chard from week 1, with gorgeous dark pink stems, and used them in Farmgirl Susan’s recipe for Swiss Chard Tuna Salad. She mixes the chard leaves into the tuna salad, and chops up the stems and uses them like celery. I figured it would be a nice way to appreciate the chard without having to cook it down.

Changes: I used cilantro instead of Italian parsley (I really meant to buy parsley; I just grabbed the cilantro instead), reduced the amount of green onion (ten stalks, really?) and I used 5-oz cans of tuna instead of 6-oz.

It’s good on a piece of toasted sourdough bread.

I like it, but the olive flavor is really strong. If I make this again, I’ll reduce the number of olives, or at least take out the bit where she adds two extra teaspoons of the olive brine. The mixture was pretty watery, too, which might be because I didn’t use enough tuna. Still, it’s a pretty tasty way to eat chard.

(Related story: I tried to share this recipe with a friend and fellow CSA subscriber who was underwhelmed with his chard, which he had simply sauteed. He said, “It sounds good, but my wife doesn’t like olives.”

“That’s okay,” I said, “I don’t think the recipe really needs the olives anyway.”

“And I don’t like canned tuna,” he said. “When I make a tuna salad, I put all sorts of stuff into it to disguise the canned tuna taste… sriracha sauce, mustard, lots of pepper…”

I gave up. “Forget it. Between you and your wife, you’d ruin this recipe.”)

summer CSA, week 2

This week’s CSA pickup from Breezy Willow: a pound of kale, a head of lettuce, four little broccoli crowns, two cucumbers, a pound of green beans, a pound of yellow squash, a bag of button mushrooms, two pounds of small red potatoes, and BLUEBERRIES. Oh, and eggs and bread (parmesan sourdough).

week 2 CSA pickup

The blueberries were the first to go. Usually I don’t mind splitting our share with our friends, but I was pretty sad to say goodbye to half that pint of blueberries. They were plump, sweet, and tasty… and now they’re all gone. Maybe I’ll find some more at the farmer’s markets.

I’m happy to see broccoli crowns and little red potatoes again, too, because what I did with them last week was so delicious that I wanted to make it again. Basically I cut the potatoes into quarters, cut the broccoli into small pieces (after peeling the tough outer fiber off the stem), and tossed both of them in olive oil with generous amounts of salt, pepper, and garlic powder. Then I scattered the pieces over two foil-lined trays and put them in the oven at 400 degrees. I took the broccoli out when the florets turned dark green and just a little crisped, and took the potatoes out a bit later when they looked browned around the edges. While they were cooking, I fried up a salmon patty (from a Costco tube of frozen patties made from wild-caught Alaskan salmon; they’re delicious). I split the salmon patty between the two of us. Total time to dinner: about twenty minutes.

weeknight dinner

when life gives you cucumber

My favorite cucumber dish is my mom’s summer cucumber salad. I’ve loved it since I was a kid. It’s very refreshing straight out of the refrigerator, cool on the tongue, with an addictive sweet-sour tang.

Most of the work goes into slicing the cucumber just right. (I don’t know where Mom picked this up, as I haven’t seen the technique anywhere else.) First she peels the cucumber, bisects it lengthwise, and scoops out the seeds. Then she turns each half cut-side-down on the cutting board and slices it by making a series of several shallow cuts, followed by one deep one. The result is a curved arc of cucumber held together at the ends, but separated in the middle. After the pieces are lightly pickled, the ends are still crunchy but the middle bits are silky and soft. It’s a fantastic combination of textures.

This is all that was left when it finally occurred to me to take a picture.

Summer Cucumber Salad

2 or 3 cucumbers
1/2 cup white vinegar (definitely use white; I tried apple cider vinegar once and the result was horrible)
1/2 cup white sugar
salt

Peel the cucumbers and slice off the ends. Cut the cucumbers in half lengthwise, and scrape out the seeds with a spoon.

Turn each half cut-side-down on the cutting board and make a series of several shallow cuts followed by a single deep cut, as shown, until all of the cucumbers are sliced. Don’t worry if you mess up a slice or two. They’re still going to be tasty.

Toss the cucumber slices with salt and let sit in a strainer for an hour or two, to soften the cucumber and drain out some of the natural liquid.

Rinse the salt off the slices, drain, and put in a bowl.

In a measuring cup at least 1 cup in size, measure out 1/2 cup of white vinegar, then add enough sugar to equal a full cup. Stir to dissolve. This step can be hurried by putting the sugar-vinegar solution in the microwave for a short period of time; this will heat the vinegar and help the sugar dissolve.

Pour the sugar-vinegar solution over the cucumber slices, toss to coat, and let marinate for a couple of hours (or longer; I usually let it sit overnight in the fridge).

Strain the cucumber mixture to get rid of excess liquid. Serve cold.

toaster oven chicken

80-plus degree days have descended upon Maryland again, and I for one am not excited about the prospect of cooking anything on the stove or in the oven. Who wants to introduce even more heat to an already overheated house?

Sure, you could fire up the grill (and indeed we did, this weekend; K worked magic on smoked lamb riblets and grilled loole kebabs). But although K is certainly a genius with charcoal, the grill takes a lot of time to set up. That’s okay; in a pinch, we have the toaster oven.

I can’t claim credit for toaster oven chicken. That idea belongs to Eric Ripert, who created an entire series of recipes using the toaster oven.

It’s simple. Basically, you cut chicken up into small pieces (Ripert uses chicken tenders, but I just cut up a chicken breast), toss the pieces with olive oil on a toaster oven tray, sprinkle with salt, pepper, and whatever fresh herbs you have lying around (dried will do in a pinch), and toss it in the toaster oven at 450 degrees or so. It’s done in under ten minutes.

For easy cleanup, I line the toaster oven tray with foil. When I made this particular batch, I minced up some rosemary, thyme, and garlic greens.

chicken before cooking

It’s good chicken, very flavorful with the herbs. We’ve served it over rice and on dinner salads. I’d say it takes fifteen minutes from start to finish; if I want to make a dinner salad, I just wash and chop the greens while waiting for the chicken to cook.

chicken after cooking

Just remember to wash your hands whenever you’ve touched raw chicken. (This is a modern warning. K likes to point out that Julia Child used to happily handle raw chicken, and then go on to cook for the rest of the episode without once approaching a sink or a soap dispenser. Times certainly have changed.)

when life gives you ham

Some people get sent home from Easter dinner with a few extra slices of ham. Somehow, though, this year we got sent home with… an entire ham. Yep, an entire ham. For two people. I have no idea how this happened.

I cut a bunch of it up into medium dice and froze it. (K, who is wise in the ways of freezing, suggested spreading the diced ham on a sheet pan and freezing it first, then pouring the frozen cubes into freezer bags so that they could be easily separated later. Brilliant.) They’ll come in handy for casseroles or whatever. Still got all these slices to deal with, though.

Anyway, it’s been ham in every meal for us. For dinner last night, I made a split pea soup with plenty of ham in it, and served it up with ham and cheese scones. My standby cheese scone recipe, I figured, was robust enough to take some extra ham.

The batter had me worried at first, because the dough was incredibly moist and shaggy. It was hard to work with, but I managed to separate it into triangles. Then I pushed it into the oven and hoped for the best.

Result: total success! The scones are near-relatives to cheesy biscuits, not dry at all, with plenty of savory ham flavor in every bite. They’re best right out of the oven, but toast up just fine the next morning (and, I hope, will continue to do so for several mornings to come).

ham and cheese scones

Ham and Cheese Mini Scones
(I like my scones smallish, but you can make yours as big as you want)

2 3/4 cup flour
2 tbsp sugar
2 tsp baking powder (make sure it’s fresh!)
1/2 tsp table salt (actually, you could probably cut the salt completely, with all the salt from the ham and cheese)
1/4 tsp baking soda
10 tbsp unsalted butter, cold, cubed
approximately 1/2 cup ham, cut in small dice
1 cup shredded cheddar cheese
1 green onion, minced
1 cup buttermilk (I used 1 tbsp white vinegar plus enough milk to equal 1 cup)
1 tbsp water (may not be necessary; add bit by bit if it looks like more moisture is needed to incorporate the dry ingredients into the dough)

Preheat oven to 375 and line a baking sheet with parchment paper (I used a silicone baking mat).

Combine dry ingredients in large bowl. Cut in butter with a pastry blender or fork until lumps of butter are pea-sized.

Stir in ham, cheddar, and green onion. Add buttermilk and stir; dough should begin to clump. Add water if necessary. Knead gently until blended.

Turn dough out onto lightly floured work surface (or another baking mat) and pat into an 8″ square. Cut into 2″ squares and then cut squares into triangles. (Or if you want big scones, pat the dough into a big circle and cut it into wedges.) Dough will be moist. Arrange scones on baking sheet, spacing 1″ apart.

Bake until golden, or until the bottoms start darkening, about 25 minutes. (Just lift one up with a pair of tongs and peek if you’re not sure.) Serve warm.